Hello World
Abstract:
This document provides a short guide to create a simple "Hello world" application with OpenESB Enterprise Edition using maven archetypes.
You will learn how to create BPEL and a composite application project, using eclipse, maven archetypes and oxygen plugin. Then you will understand how to deploy and test your project..
Contents
Introduction
When we start learning about a product, it is customary to start with a 'hello word exercise'. Through this simple exercise easily understood by anyone, we develop a first application, and get our first thrill and enjoyment by getting Hello + Name.
OpenESB Enterprise Edition (OEE) offers the lightest and most efficient service oriented integration tools on the market. Powerful, prompt, scalable with a very low memory footprint, OEE is perfect for virtualization and cloud deployment.
Before starting
We suppose you have already installed OpenESB on your machine, Eclipse IDE with the Oxygen plugin installed, as described in the guide OpenESB Eclipse Studio. To be able to use the archetypes, it is necessary to configure the Maven settings.xml file and add the archetypes to the Eclipse archetype catalog Maven Archetypes .
What you will learn in this document
This tutorial agenda is:
-
Create a BPEL project
-
Create a composite application project
-
Deploy a project
-
Test a project
As much as possible we try to be clear and concise in our tutorial. Feel free to contact us to give us your feedback [innova@vico.org]
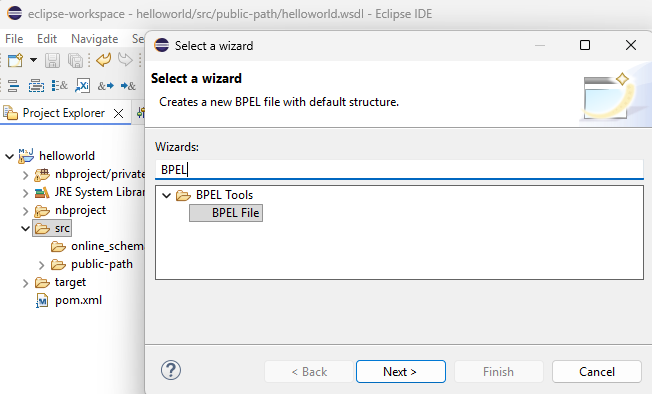
Create BPEL project
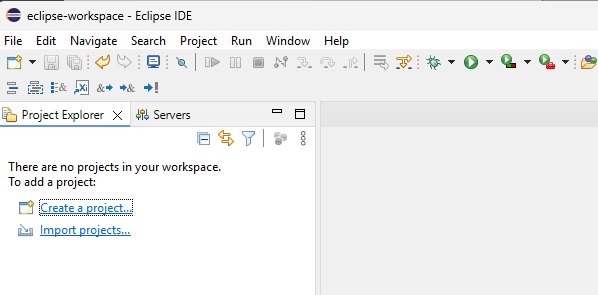
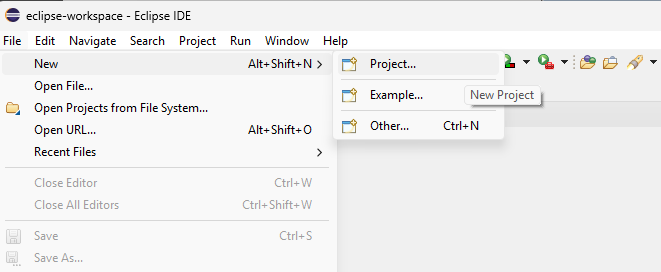
In this paragraph, we will create the "Hello World" Services. To do it we have to open the Eclipse IDE on the project explorer tab you can click Create Project or use the menu File → New → Project.
 |  |
Chose the category Maven and then choose the Maven Project.
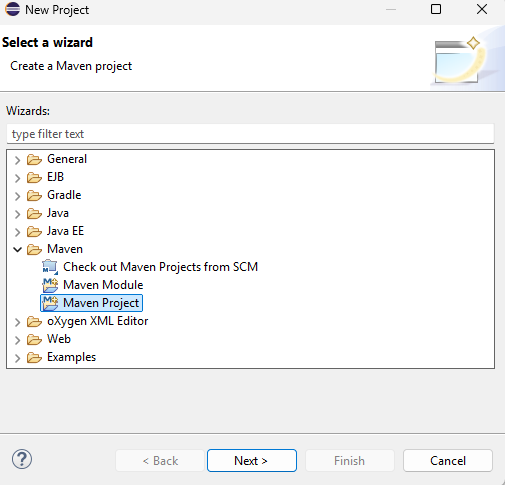
Click on Next.
The wizard will ask you where to create the project. Since Eclipse is already configured with the OpenESB Enterprise Edition archetype catalog, it will display the available archetypes.
In this case, as we want to run a BPEL project, we will select the artifact ID soa-bpel-module-archetype
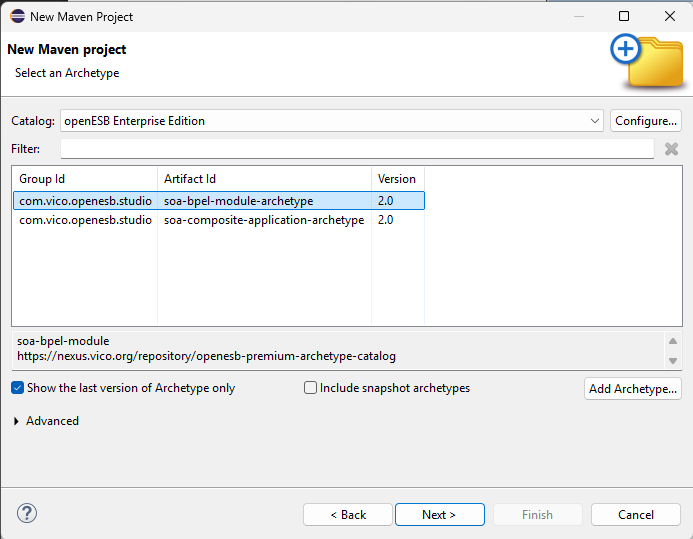
Click on Next.
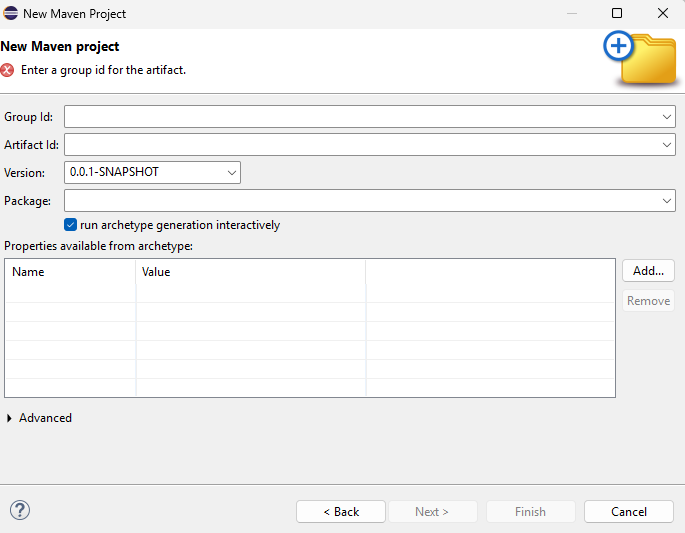
Enter Group Id (e.g. com.example.helloworld), Artifact Id (e.g. helloworld-bpel), Version (e.g. 1.0-SNAPSHOT), and click Finish to create the project.
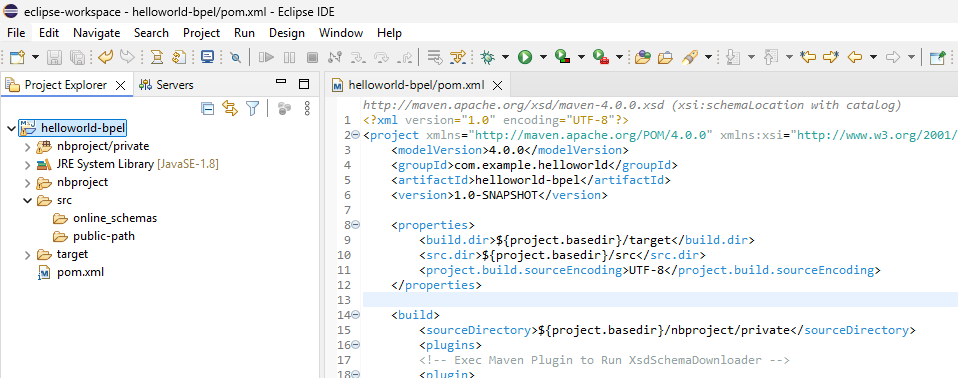
After a while, the base structure of a BPEL project is automatically generated, creating the required folder layout and the initial files
During this process, a pom.xml file is created containing all the project build information.
Thanks to this configuration, the project can be compiled, validated, and packaged in a reproducible and automated way.
Before starting with the BPEL generation and orchestration, we must define the contract of our Hello World service, which is described using a WSDL. This contract defines the available operation(s) and the input and output parameters of the service.
For the Hello World service, the input parameter is a String and the output parameter is also a String. In this example, the service exposes basic data types as both input and output. However, services can also expose more complex data structures.
In WSDL, this is achieved by defining either basic XML Schema types (such as xsd:string, xsd:int, or xsd:boolean) or complex data schemas using xsd:complexType. Complex types allow the definition of structured elements composed of multiple fields, nested elements, and data constraints. By using XML Schemas (XSD), the service contract can accurately describe complex business objects, ensuring interoperability, validation, and a clear definition of the data exchanged between service consumers and providers.
In order to be able to create and correctly visualize the services in the Service Directory of OpenESB Enterprise Edition, you should follow these best-practice recommendations when creating WSDL and XSD files Document and Publish WSDL/XSD in the OpenESB Service Directory .
Create a WSDL
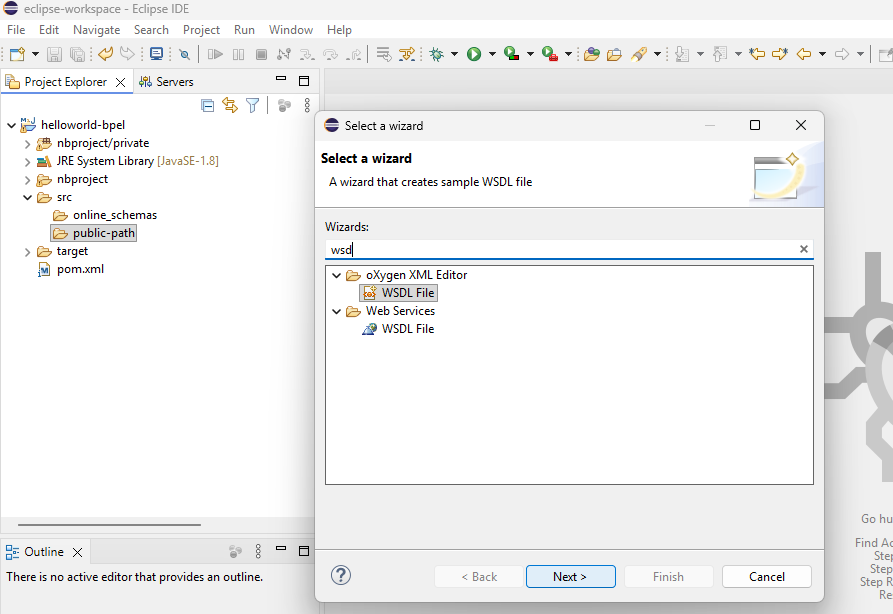
By selecting the public-path folder, we will create a new file. We can use the WSDL wizard provided by Eclipse, or alternatively generate it using Oxygen, where the plugin will validate and guide us through its definition. (Right-click on the public-path folder and select → New → Other)
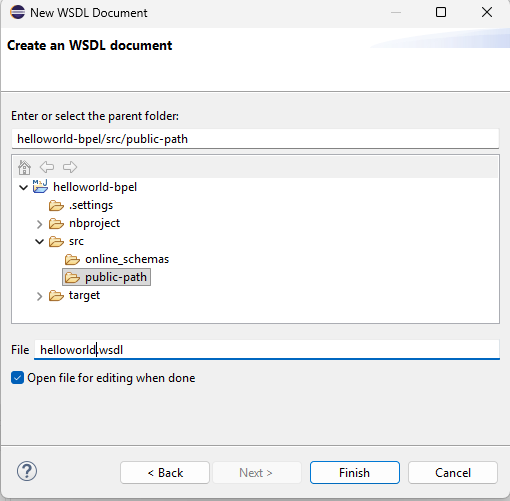
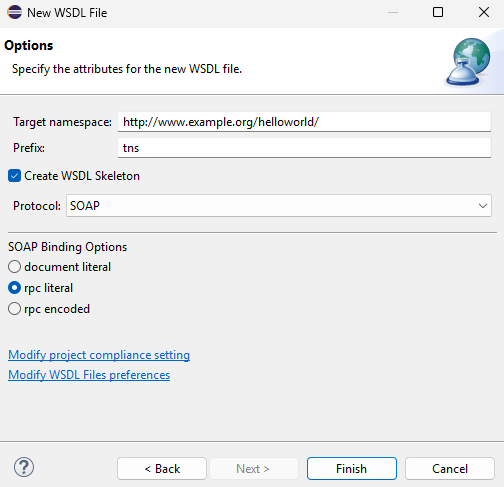
Type helloworld as File Name and click Next, very important modify target namespace, if you select "Create WSDL Skeleton", the wizard will allow you to specify the protocol, Soap or Http and the protocol binding options used by the service. Use SOAP protocol and rpc literal, because we want to use basic types such as string, in case of using complex data, we would use the document literal. Then click on Finish.
 |  |
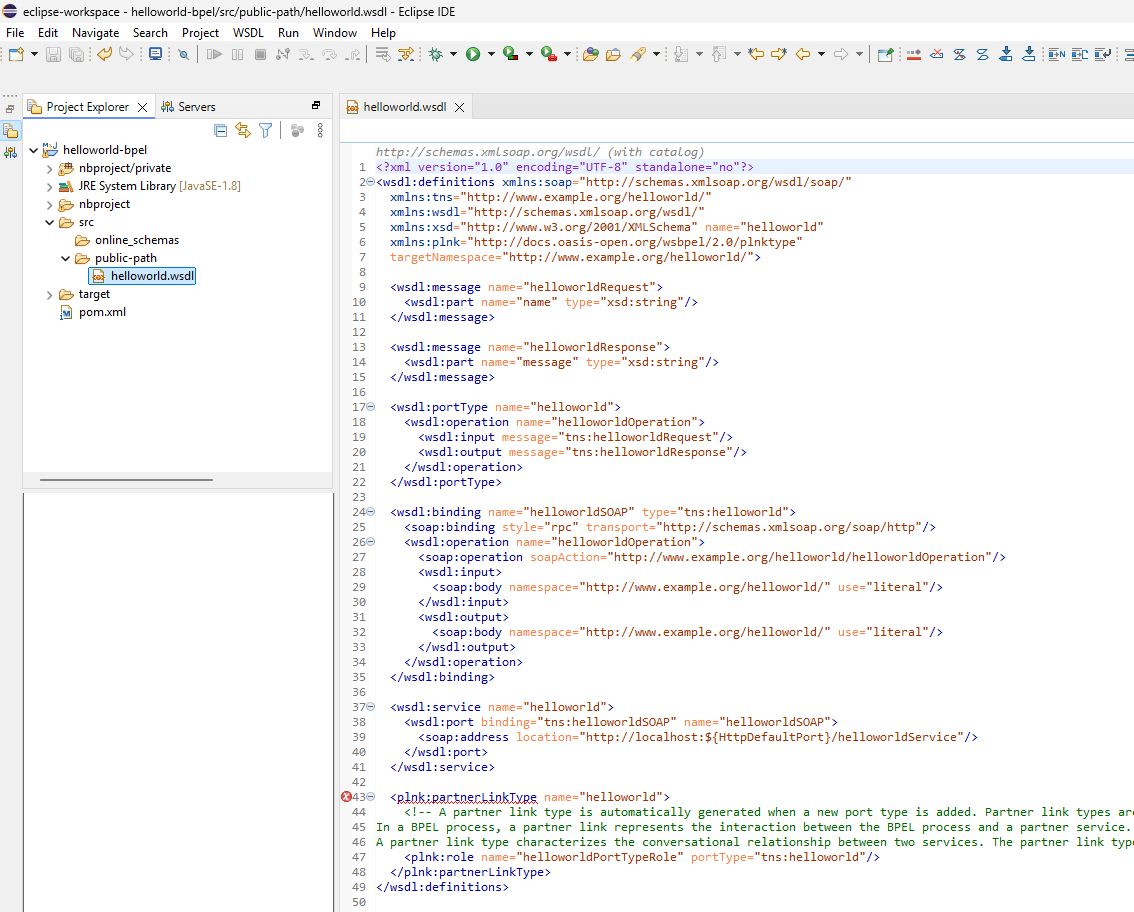
The helloworld wsdl file has been added to your project, this file contains the basic structure of a WSDL, and it must be modified to define the operations names and the input and output data of the service. When defining a WSDL, it is very important to include the definition of plnk:partnerLinkType using the namespace xmlns:plnk="http://docs.oasis-open.org/wsbpel/2.0/plnktype" on the wsdl declaration.
This definition allows the WSDL to be correctly used by BPEL processes, enabling the proper declaration of partnerLinks and clearly defining the roles (myRole and partnerRole) involved in the service interaction.
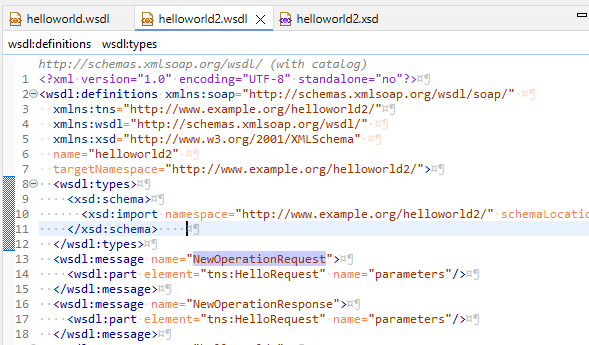
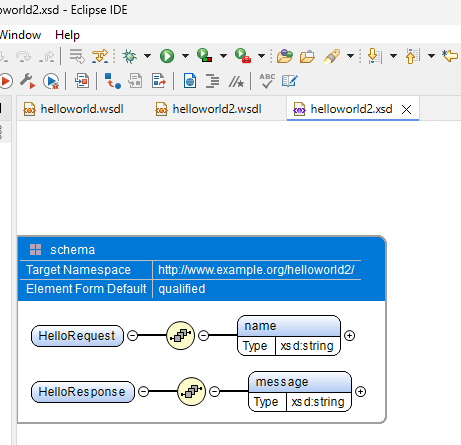
When using document literal, type information is added, which can be separated into an XSD file and then imported into the WSDL. The Oxygen plugin allows us to perform this task in a graphical and very user-friendly way
 |  |
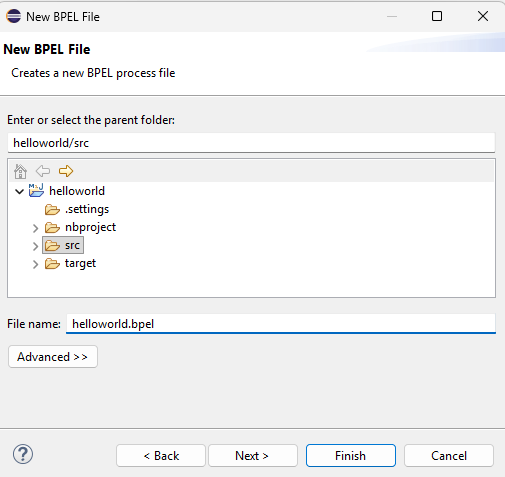
Create a BPEL
We go to the Project Explorer in the Eclipse IDE and, on the src directory, we add a new BPEL file (Right-click on the src folder and select → New → Other)
 |  |  |
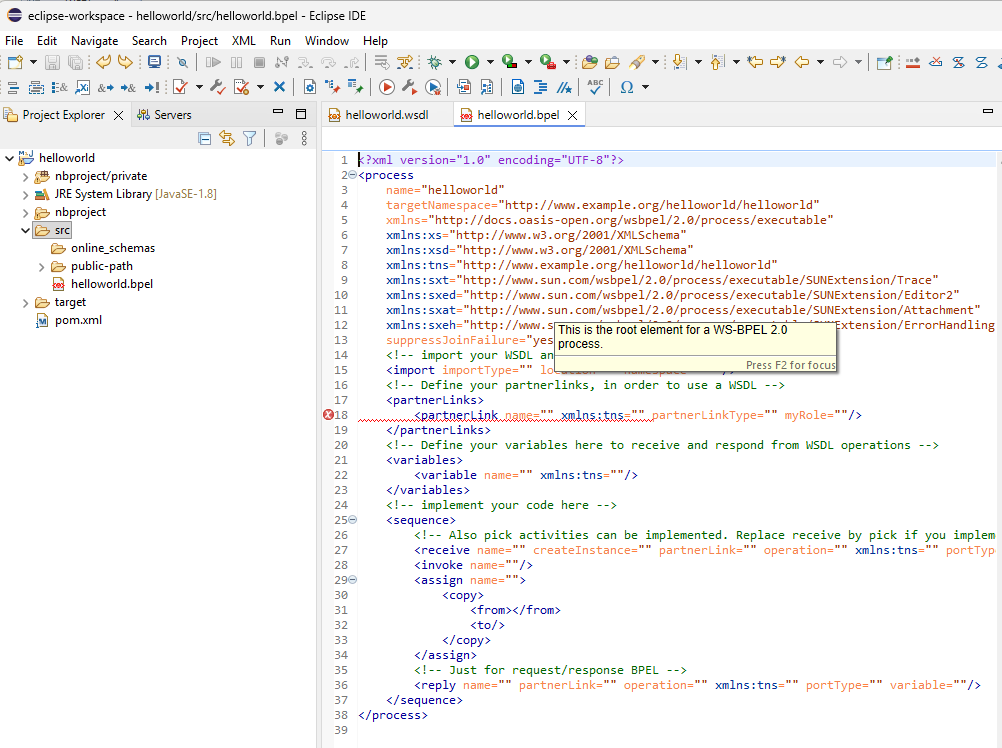
In the wizard, you must specify the name and the namespace of the BPEL process. Once completed, the helloworld BPEL file is added to your project. This file contains the basic skeleton of the BPEL process and serves as a starting point.
Following the BPEL-as-code approach, the BPEL process is created and edited directly as XML using Eclipse together with the Oxygen plugin, instead of relying on a visual editor. This approach provides full control over the process structure, namespaces, and generated artifacts.
Once the BPEL file is created, it is edited manually as code, taking advantage of Oxygen's context-aware autocompletion and continuous validation. At this stage, the file is updated to define the imports, partner link, recive, reply etc…, ensuring that the process implementation is clear, consistent, and fully aligned with the service contract.
imports
In a BPEL process, imports are used to reference external resources such as WSDL and XSD files. They allow the process to understand the service operations it interacts with and the structure of the input and output data. Imports ensure that the BPEL process is correctly linked to its service contracts and data definitions.
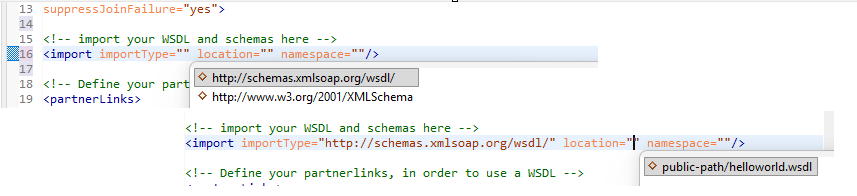
The generated BPEL must be updated to include all the required imports, such as the WSDL and XSD schemas that the process will use during its execution.
When defining an import and specifying its type (either schema or WSDL), the editor automatically filters the existing files in the project according to the selected type, making it easy to select and add the appropriate resources.
partnerLinks
In a BPEL process, partnerLinks define the communication relationship between the process and external services. Each partnerLink specifies two roles: myRole, which represents the role played by the BPEL process itself, and partnerRole, which represents the external service it interacts with. This separation clearly defines who provides and who consumes a service within the process.
To define a partnerLink, a name must be provided. It is recommended to follow a naming convention such as PL___ followed by a meaningful identifier.
The remaining parameters are automatically suggested by the editor based on the imported WSDL files and their defined partnerLinkType elements.
At this point, it is very important to correctly identify which roles correspond to external connections (external services) and which ones represent the BPEL process itself, using the partnerRole and myRole attributes respectively.

variable
In a BPEL process, variables are used to store and manipulate data during the execution of the process. They typically hold input messages, output messages, and intermediate data exchanged between activities.
A variable is defined using the <variable> element and represents data used during execution. Each variable has a name and can be linked to data using only one of the following: a WSDL message (messageType), an XML Schema type (type), or an XML Schema element (element).

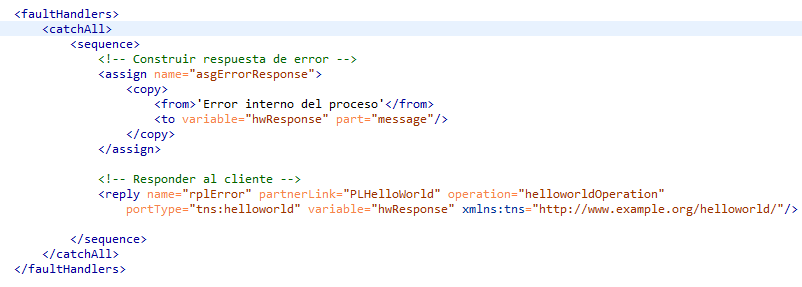
faultHandlers at Process-Level
The process-level fault handler is used to control errors globally and ensure that the BPEL process always finishes correctly.
It is defined in the declarative section of the process and applies to all activities, independent of the normal execution flow.
If any unexpected error occurs during execution, the fault handler:
-
Captures the fault
-
Prevents the process from ending in a
FAULTEDstate -
Returns a controlled and meaningful response to the client
-
Ensures the process terminates cleanly
This mechanism acts as a safety net, making the HelloWorld process robust, predictable, and easy to understand.
In addition to the process-level fault handler, BPEL also allows faultHandlers to be defined inside a <scope> activity.
Scope-level fault handlers are used to control the execution flow locally when an error occurs in a specific part of the process. This makes it possible to:
-
Handle errors close to where they occur
-
Apply different recovery or fallback logic
-
Prevent local failures from affecting the entire process
When a fault is caught inside a scope, the process can continue with an alternative execution path instead of triggering the global fault handler.
This combination of process-level fault handling (global control) and scope-level fault handling (local control) provides a flexible and robust error management strategy
Implementing the Process Logic
Once the declarative part of the BPEL process is defined—including imports, partner links, variables, and the process-level fault handler—the next step is to implement the executable logic of the process.
The executable logic is defined in the process body, typically using a top-level <sequence> activity. This sequence describes how the process behaves at runtime and in which order the actions are executed.
In a simple HelloWorld example, the process logic follows a straightforward request–response pattern:
-
Receive the request
The process starts by receiving an incoming message from the client.
This activity also creates a new instance of the process. -
Build the response
The process assigns a static "Hello World" message to the response variable.
No business logic is required at this stage, making the example easy to understand. -
Send the response
The process replies to the client using the previously prepared response message.
This minimal flow demonstrates the core concepts of BPEL execution while keeping the example simple and focused. All errors that may occur during execution are handled by the previously defined process-level fault handler, ensuring controlled and predictable behavior.
In this section, we explain the main activities used in the process logic.
receive
In a BPEL process, the receive activity is used to accept incoming messages and trigger the execution of the process. It typically represents the entry point of the process and is responsible for receiving input data from a service consumer.
A receive activity is defined using the <receive> element and represents the action of waiting for and consuming an incoming message. Each receive activity has a name and must specify the service interaction by referencing a partner link (partnerLink), a port type (portType), an operation (operation), and a target variable (variable) where the received message is stored. When the attribute createInstance is set to "yes", the receive activity creates a new instance of the process upon message arrival

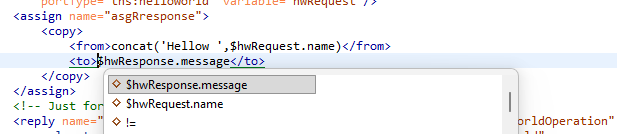
assign
In a BPEL process, the assign activity is used to manipulate and prepare data during execution. It typically copies, transforms, or initializes data between variables and is commonly used to build the output message from the received input.
An assign activity is defined using the <assign> element and represents a set of data copy operations. Each assign activity has a name and contains one or more <copy> elements, where each copy defines a source (from) and a target (to). The assign activity allows values to be transferred between variables, variable parts, XML elements, or literal values, enabling the process to prepare the data required for subsequent activities.
Our auto-suggestion plugin allows users to load and browse the available XPath expressions of process variables. These XPath expressions can be selected and used in both the from and to elements of an assign activity, making it easier to reference variable content and assign values correctly.
We recommend using XSLT transformations when assignments become complex, as this approach improves performance, readability, and maintainability of the process logic.
reply
In a BPEL process, the reply activity is used to send a response message back to the service consumer. It typically completes a request–response interaction by returning the output data produced during process execution.
A reply activity is defined using the <reply> element and represents the action of sending a message to a client. Each reply activity has a name and must reference the service interaction by specifying a partner link (partnerLink), a port type (portType), an operation (operation), and a variable (variable) containing the response message to be sent.

Save your BPEL, note that the red signs are not present anymore; it indicates your BPEL is valid without error.
<![CDATA[<?xml version="1.0" encoding="UTF-8"?>
<process name="helloworld" targetNamespace="http://www.example.org/helloworld/helloworld"
    xmlns="http://docs.oasis-open.org/wsbpel/2.0/process/executable"
    xmlns:xs="http://www.w3.org/2001/XMLSchema" xmlns:xsd="http://www.w3.org/2001/XMLSchema"
    xmlns:tns="http://www.example.org/helloworld/helloworld"
    xmlns:sxt="http://www.sun.com/wsbpel/2.0/process/executable/SUNExtension/Trace"
    xmlns:sxed="http://www.sun.com/wsbpel/2.0/process/executable/SUNExtension/Editor2"
    xmlns:sxat="http://www.sun.com/wsbpel/2.0/process/executable/SUNExtension/Attachment"
    xmlns:sxeh="http://www.sun.com/wsbpel/2.0/process/executable/SUNExtension/ErrorHandling"
    suppressJoinFailure="yes">
    <!-- import your WSDL and schemas here -->
    <import importType="http://schemas.xmlsoap.org/wsdl/" location="public-path/helloworld.wsdl"
        namespace="http://www.example.org/helloworld/"/>
    <!-- Define your partnerlinks, in order to use a WSDL -->
    <partnerLinks>
        <partnerLink name="PLHelloWorld" xmlns:tns="http://www.example.org/helloworld/"
            partnerLinkType="tns:helloworld" myRole="helloworldPortTypeRole"/>
    </partnerLinks>
    <!-- Define your variables here to receive and respond from WSDL operations -->
    <variables>
        <variable name="hwRequest" xmlns:tns="http://www.example.org/helloworld/"
            messageType="tns:helloworldRequest"/>
        <variable name="hwResponse" xmlns:tns="http://www.example.org/helloworld/"
            messageType="tns:helloworldResponse"/>
    </variables>


    <faultHandlers>
        <catchAll>
            <sequence>
                <!-- Construir respuesta de error -->
                <assign name="asgErrorResponse">
                    <copy>
                        <from>'Error interno del proceso'</from>
                        <to variable="hwResponse" part="message"/>
                    </copy>
                </assign>


                <!-- Responder al cliente -->
                <reply name="rplError" partnerLink="PLHelloWorld" operation="helloworldOperation"
                    portType="tns:helloworld" variable="hwResponse" xmlns:tns="http://www.example.org/helloworld/"/>


            </sequence>
        </catchAll>
    </faultHandlers>

    <!-- implement your code here -->
    <sequence>
        <!-- Also pick activities can be implemented. Replace receive by pick if you implement multiple operations -->
        <receive name="rcvHelloWorld" createInstance="yes" partnerLink="PLHelloWorld"
            operation="helloworldOperation" xmlns:tns="http://www.example.org/helloworld/"
            portType="tns:helloworld" variable="hwRequest"/>
        <assign name="asgRresponse">
            <copy>
                <from>concat('Hellow ',$hwRequest.name)</from>
                <to>$hwResponse.message</to>
            </copy>
        </assign>
        <!-- Just for request/response BPEL -->
        <reply name="rplHelloWorld" partnerLink="PLHelloWorld" operation="helloworldOperation"
            xmlns:tns="http://www.example.org/helloworld/" portType="tns:helloworld"
            variable="hwResponse"/>
    </sequence>
</process>]]>
. Click on
Create Composite Application project
To deploy an application with OpenESB you have to create a composite application. A composite application is the deployable entity for OpenESB.
In the same way we created the BPEL project, we will now create the Composite Application (CA) for the "Hello World" service. To do this, open the Eclipse IDE and, in the Project Explorer view, click Create Project or use the menu File → New → Project.
| |
Chose the category Maven and then choose the Maven Project.
Click on Next.
In this case, as we want to run a composite application, we will select the artifact ID soa-composite-application-archetype
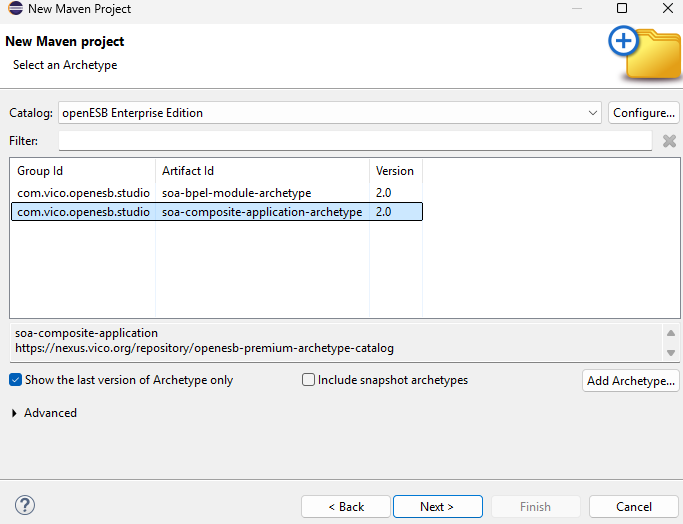
Click on Next.
Enter Group Id (e.g. com.example.helloworld), Artifact Id (e.g. helloworld-ca), Version (e.g. 1.0-SNAPSHOT), and click Finish to create the project.
After a while, the base structure of a composite application project is automatically generated, creating the required folder layout and the initial files
During this process, a pom.xml file is created containing all the project build information. This file also includes specific configuration related to the BPEL project, which must be updated using a script provided as part of the project.
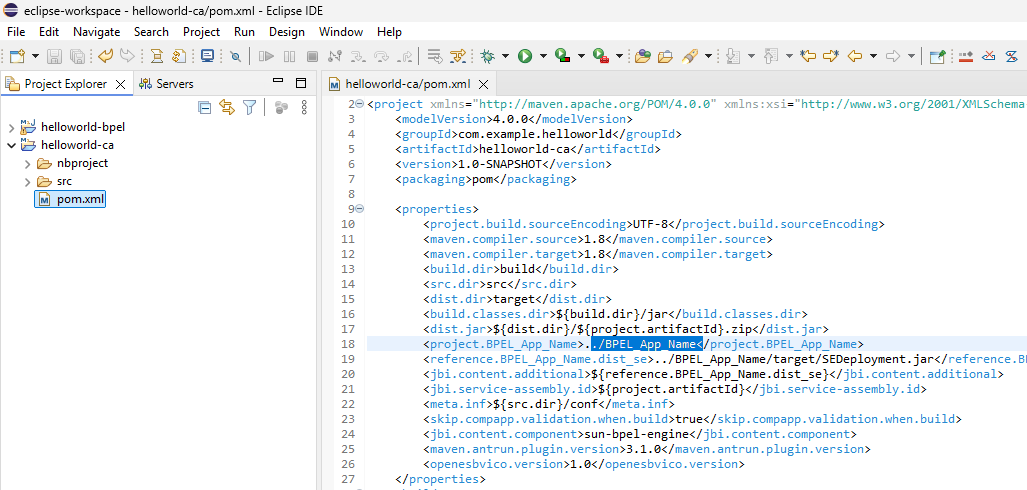
Immediately after creating the project and once the pom.xml has been generated, it is required to add a project description to the POM. This description is mandatory to avoid errors during the generation of the final artifact and to ensure the Maven build process completes successfully.
The error that appears is the same as the one shown in the image below.

Add the BPEL Modules in a composite application
Open the dragdropautomation.properties file located in /src/conf and update it with the information related to the Composite Application (CA) and the BPEL projects used.
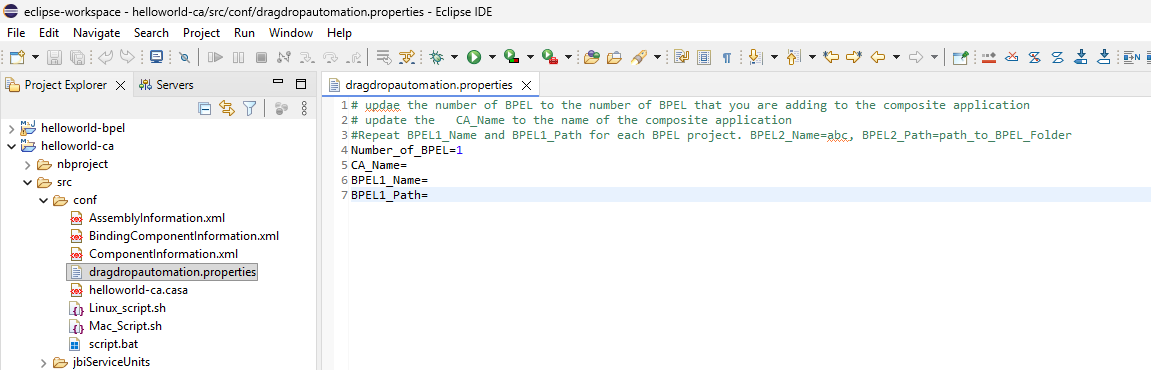
In this file, you must specify:
-
The total number of BPEL projects included in the Composite Application
-
The name of the Composite Application
-
The name and relative path of each BPEL project, the value must be specified as a relative path from the location of the Composite Application pom.xml file to the corresponding BPEL project directory
For a HelloWorld example, the configuration would be similar to the following:
<![CDATA[# Update the number of BPEL projects included in the Composite Application
Number_of_BPEL=1

# Set the name of the Composite Application
CA_Name=helloworld-ca

# Define each BPEL project name and its relative path
BPEL1_Name=helloworld-bpel
BPEL1_Path=../helloworld-bpel
]]>
If multiple BPEL projects are added to the Composite Application, the properties BPELX_Name and BPELX_Path must be repeated for each BPEL, where X corresponds to the BPEL index (BPEL2_Name, BPEL2_Path, BPEL3_Name, BPEL3_Path, etc.).
This configuration ensures that all BPEL projects are correctly included during the Composite Application build process.
Run the Automation Script
The automation script updates several key files of the Composite Application: pom.xml, assemblyInformation.xml, and the .casa file. These updates include registering the required Service Units and aligning the project structure automatically, avoiding manual configuration errors. The script can be executed in two ways: directly from Eclipse (recommended) by opening a terminal from the Project Explorer, which ensures the correct working directory is used.
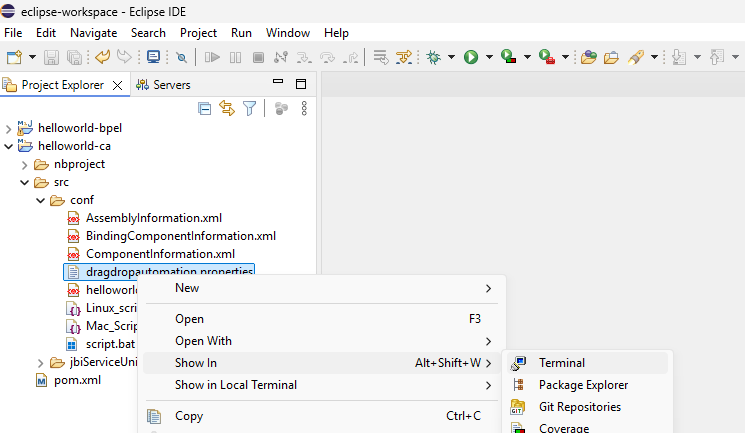 | 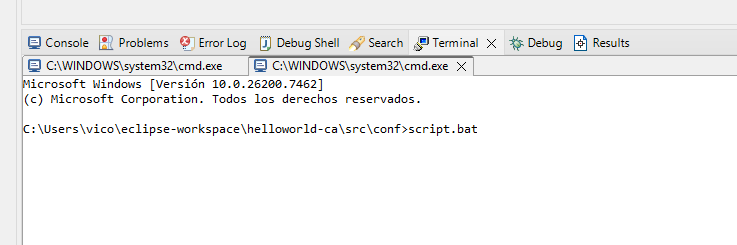 |
Or manually from the Command Prompt / Terminal, navigating to the project directory and running the script from there:
Windows Users
a. Open the Command Prompt.
b. Navigate to the directory that contains the automation files.
c. Run the script using the following command:
<![CDATA[.\script.bat
]]>
Linux / macOS Users
a. Open a terminal.
b. Navigate to the directory that contains the automation files.
c. Execute the script corresponding to your operating system:
- macOS:
<![CDATA[./Mac_Script.sh
]]>
- Linux:
<![CDATA[./Linux_script.sh
]]>
Build the Composite Application
Runs the Maven build command mvn clean install after ensuring that the BPEL component has been generated beforehand. This step verifies that the updated Composite Application builds successfully with all required artifacts in place.
Deployment
Deploy a new service assembly Select Service Assemblies in the main menu.

Click on the button deploy, then chose de file you want to deploy
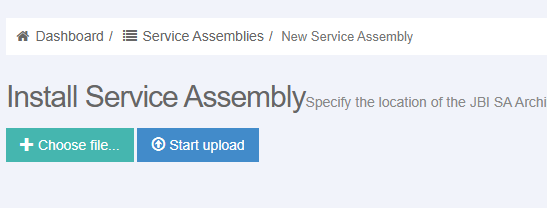
Once you choose the file click on start upload, when the process finishes, the details of the Service Assembly will be displayed.
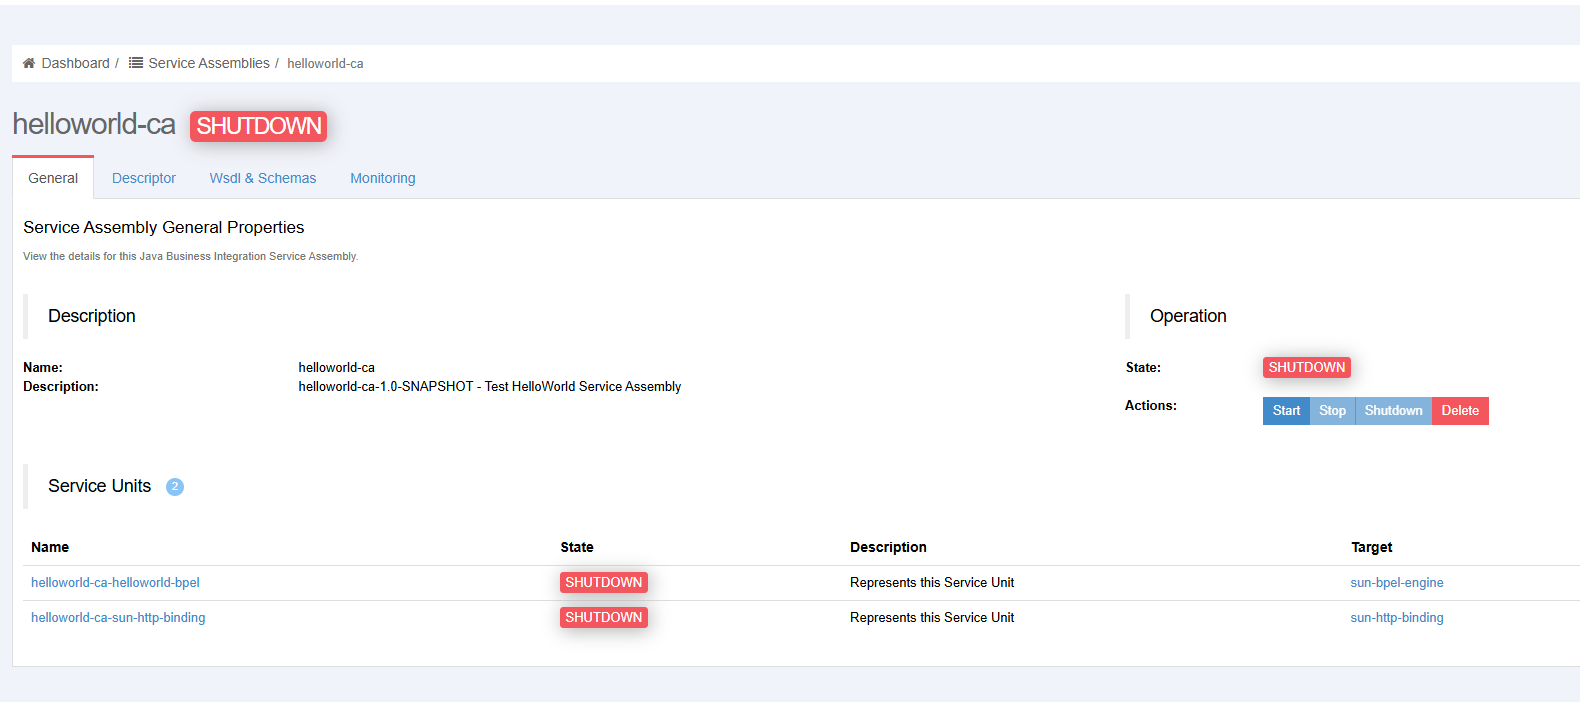
The General tab is used to manage the Service Assembly life cycle. To start, stop or shutdown the Service Assembly, just click on the relevantbutton.
Test the application.
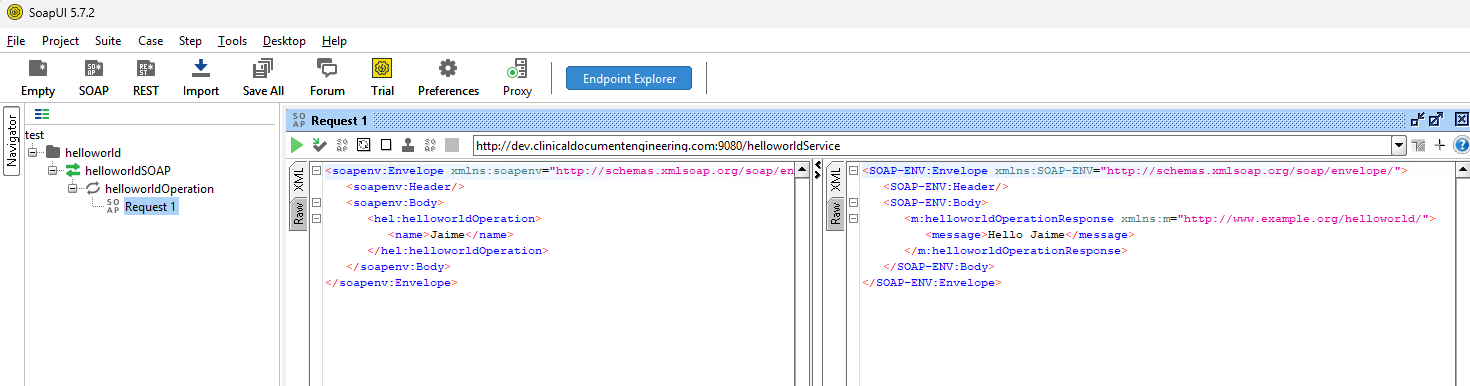
To validate the correct behavior of the HelloWorld, we will use SoapUI as the testing tool. SoapUI allows us to easily invoke the exposed SOAP web service and verify that the service is correctly deployed and responding as expected.
Using SoapUI, we can send a SOAP request to the HelloWorld service endpoint and check the returned response message. This approach is especially useful for the HelloWorld example, as it provides a simple and visual way to confirm that the Composite Application, the BPEL process, and the Service Assembly have been correctly generated and deployed.
SoapUI will be used to perform a basic functional test, ensuring that the service endpoint is reachable, the operation is executed successfully, and a valid response is returned. This test serves as the final verification step of the HelloWorld application before moving on to more advanced scenarios.
Creating a SoapUI Project from a WSDL
To test the HelloWorld application, a SoapUI project can be generated directly from the service WSDL by following these steps:
-
Open SoapUI
-
From the main menu, select File → New SOAP Project.
-
In the New SOAP Project dialog, fill in the following fields:
-
Project Name:
helloworld -
Initial WSDL:
<![CDATA[http://host:port/helloworldService?wsdl
]]>
-
-
Enable the following options:
-
Create Requests
-
Create TestSuite
-
-
Click OK to generate the project.
SoapUI will automatically create the SOAP interface, operations, sample requests, and a basic TestSuite based on the WSDL definition.
Once the project is created, you can open the generated request, adjust the request parameters if needed, and execute it to verify that the HelloWorld service is correctly deployed and responding.
Congratulation!!! It works. You're the best ;-).