What is Continuous Integration?
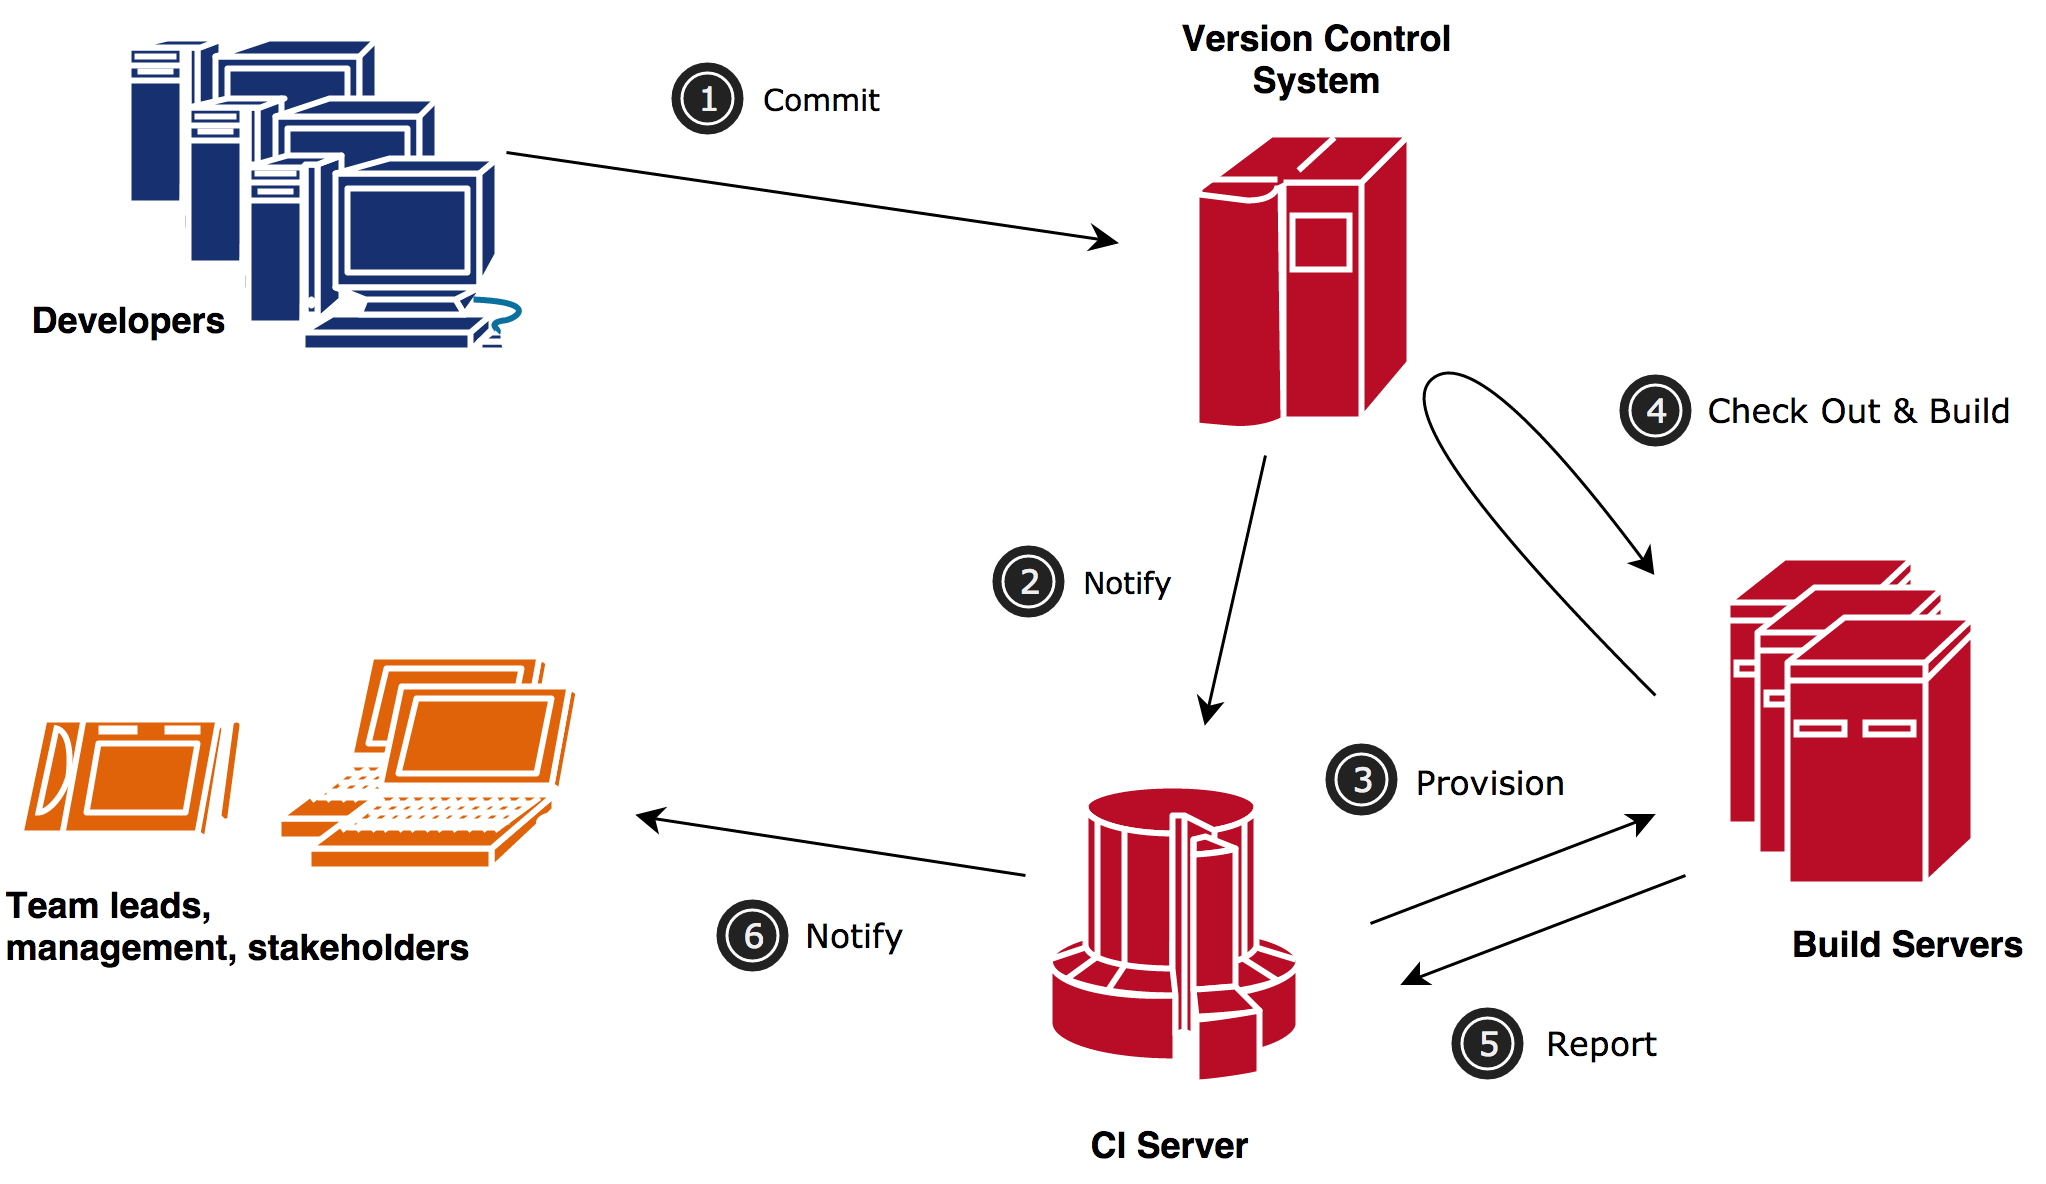
Continuous Integration is a software development practice based on integrating and building code with every change or periodically, after which automated builds and tests are executed.
How is Continuous Integration used?
It is generally used within Agile software development workflows. Usually, tasks are managed in Jira by projects, where they can be visualized in each of the three existing states. These tasks are distributed among the software engineering team members for delivery. Tasks can be developed in parallel and independently by the assigned developers. Once a developer completes a task, they introduce their code changes to integrate them with the rest of the project.
With every code modification, the project is compiled, verified to ensure it contains no errors, and then deployed.
Steps for Continuous Integration
-
Jira Project Management Tool
-
Bitbucket Version Control
-
Atlassian Pipeline (Building consists of compiling, testing, inspecting, and deploying)
-
Nexus Artifact Repository
-
SonarQube, a platform for source code quality evaluation
Bitbucket Version Control
Bitbucket is a Git-based source code repository management platform developed by Atlassian. It is designed to facilitate collaboration between software development teams, allowing source code to be stored, organized, and managed efficiently and securely.
Main Features
Version Control
It allows tracking and managing code changes over time, facilitating collaboration and conflict resolution.
Team Collaboration
It provides tools such as pull requests and code reviews, which encourage interaction and review among developers.
Integration with Atlassian Tools
It integrates natively with Jira, improving project management and task tracking.
Bitbucket Pipelines
It includes a Continuous Integration and Continuous Delivery (CI/CD) system that allows automated testing and deployments directly from the platform.
Unlimited Private Repositories
It allows the creation of unlimited private repositories for software development projects.
Branching Strategy for Our Projects (OpenESB and openCDE)
Our projects follow a branch-based workflow to ensure proper development organization, stability, and controlled deployments.
Main Branches
main
Contains the stable and production-ready version of the project.
develop
Main integration branch where completed developments are merged before preparing a release.
release
Branch used to prepare production releases, perform final validations, and fix deployment-related issues.
Development Workflow
-
Developers create and work on their tasks independently.
-
Changes are committed and pushed to development branches.
-
Once completed, changes are merged into the
developbranch. -
The CI/CD pipeline automatically builds, tests, and validates the project.
-
When a stable version is ready, a
releasebranch is prepared. -
After validation, the release is merged into the
mainbranch for production deployment.
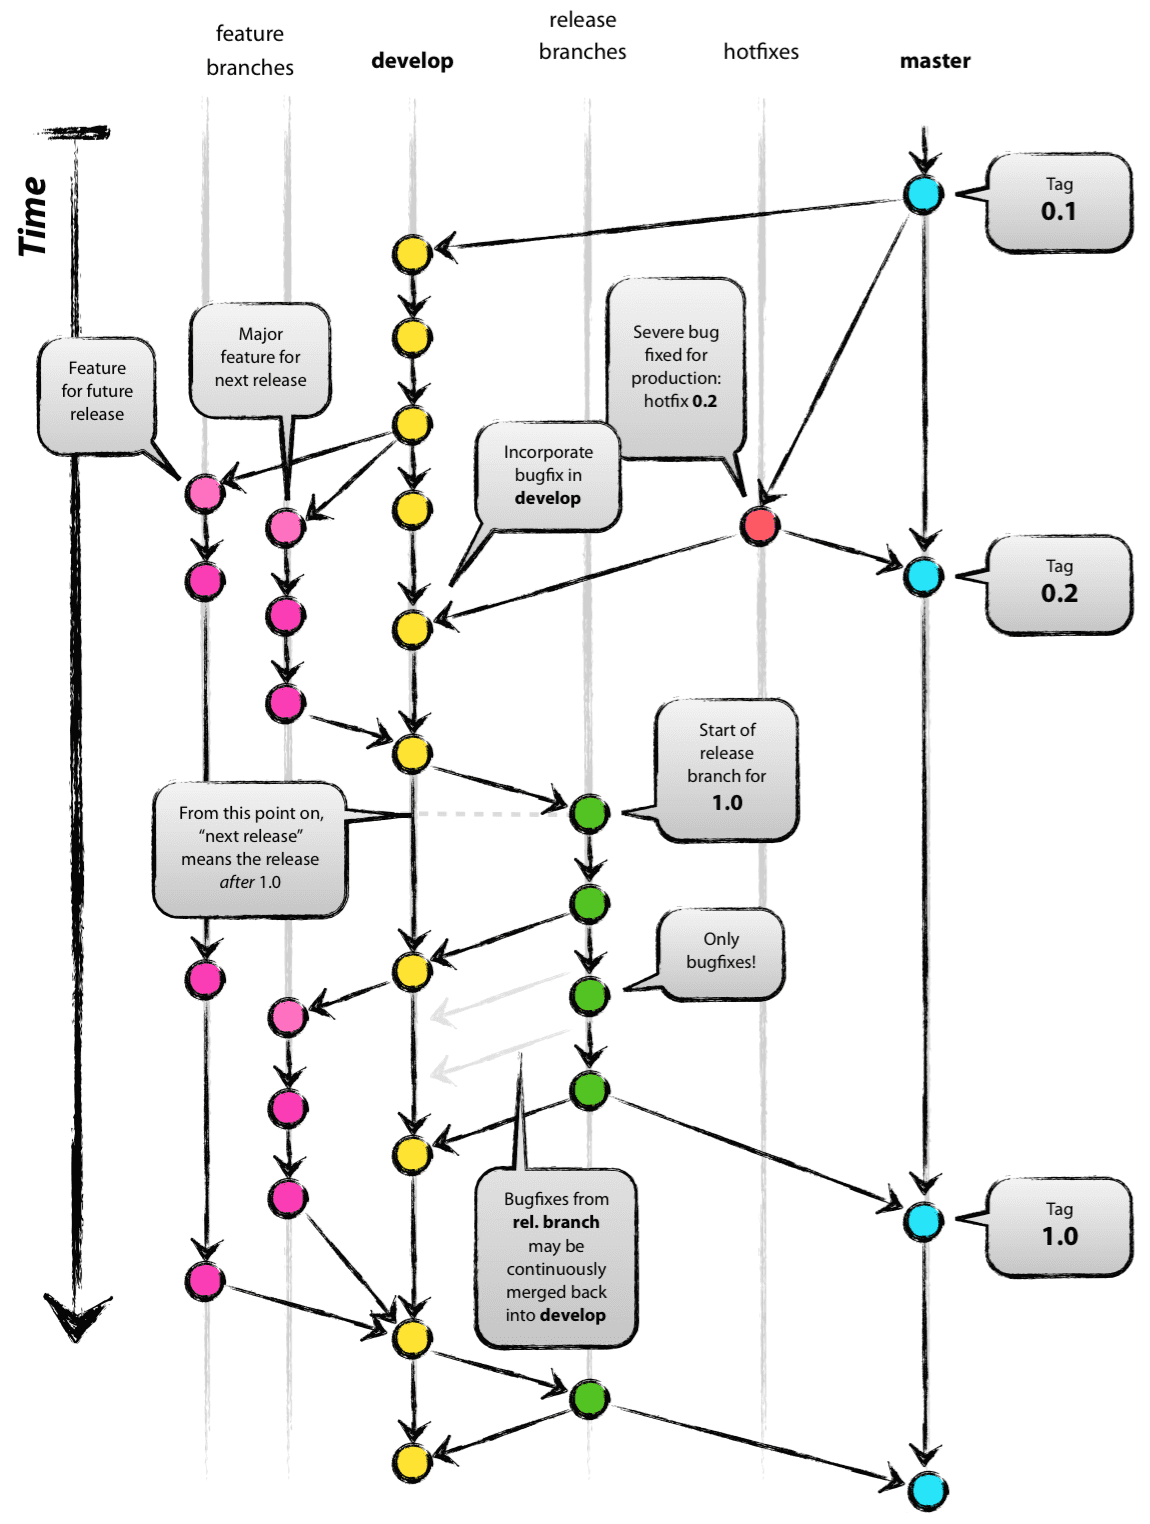
For further information regarding source code management practices at Vico, please refer to the following link: https://nvie.com/posts/a-successful-git-branching-model/
Atlassian Pipeline
It allows the creation of powerful and automated workflows.
How does it work?
It is used to automatically build, test, and deploy applications.
A pipeline is created in the openesb-componentes project.
At the root level of the repository, a file named bitbucket-pipelines.yml is created. This file is considered source code and therefore must be defined in each repository where Continuous Integration is intended to be applied.
<![CDATA[#  Template maven-build

#  This template allows you to test and build your Java project with Maven.
#  The workflow allows running tests, code checkstyle and security scans on the default branch.

# Prerequisites: pom.xml and appropriate project structure should exist in the repository.

image: maven:3.6.3-jdk-8

pipelines:
  default:
    - parallel:
      - step:
          name: Deploy and Build OpenESB-EE
          caches:
            - maven
          script:
            - mvn clean install -DskipTests -s settings.xml -U
            - mvn sonar:sonar -Dsonar.host.url=$serverSonar -Dsonar.login=$sonarToken
          after-script:
              # Collect checkstyle results, if any, and convert to Bitbucket Code Insights.
            - pipe: atlassian/checkstyle-report:0.3.0]]>
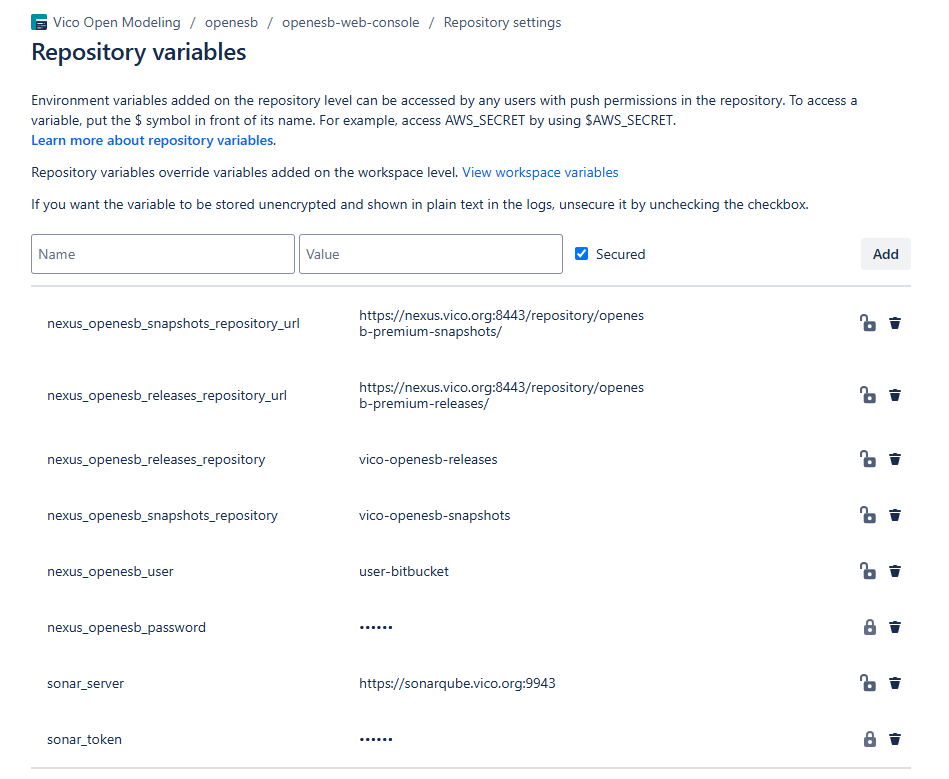
Remember to add the variables referenced by the pipeline. Different types of variables can be securely configured, keeping their contents hidden and protected.
In our case, we have added the credentials for both Nexus and SonarQube, including the username and password required for authentication.
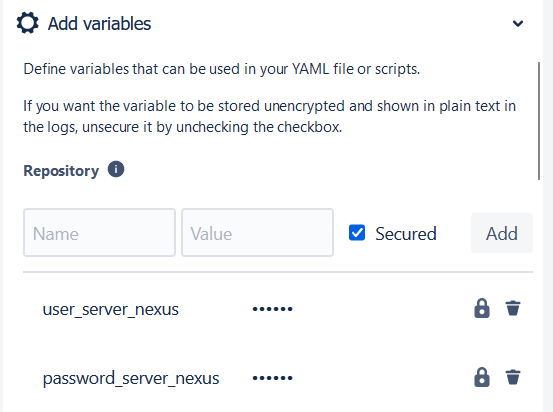
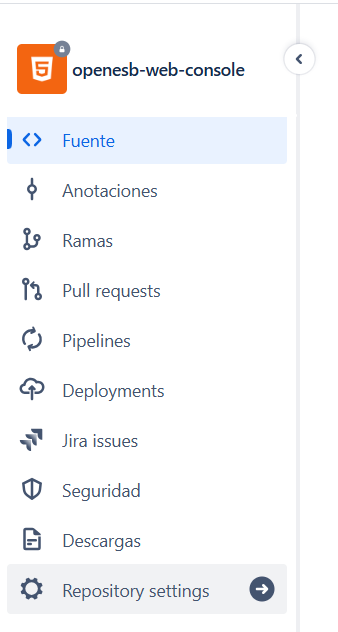
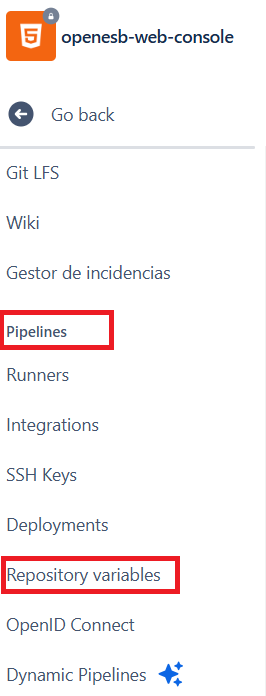
To add these variables, administrator permissions are required. To add or modify them, go to the repository settings.
Nexus Repository
If it is necessary to configure information related to the server where the repository is located, and if it is protected with credentials, a settings.xml file will also be required. In this file, pipeline variables will also be referenced. In this way, the settings files can be generic for all repositories, with the key point being to define the same variables across the different repositories.
Currently, we use Bitbucket Pipelines to execute Maven commands, although they allow many other types of actions.
In summary, we have created a settings.xml and a bitbucket-pipelines.yml as generic as possible so they can execute a Maven command and a code analysis. These files only need to be copied into the desired repository, along with the creation of the corresponding pipeline variables.
If mvn clean install works locally, the pipeline should also work.For the specific case of OpenESB, where we have applied this type of Continuous Integration, the variables that must be defined in each repository of the OpenESB project are the following:
If it is necessary to configure information related to the server where the repository is located, and if it is protected with credentials, a settings.xml file will also be required. In this file, pipeline variables will also be referenced. In this way, the settings files can be generic for all repositories, with the key point being to define the same variables across the different repositories.
Currently, we use Bitbucket Pipelines to execute Maven commands, although they allow many other types of actions.
In summary, we have created a settings.xml and a bitbucket-pipelines.yml as generic as possible so they can execute a Maven command and a code analysis. These files only need to be copied into the desired repository, along with the creation of the corresponding pipeline variables.
If mvn clean install works locally, the pipeline should also work.

Nexus Repository Manager
Nexus is a repository manager that stores "artifacts". It is a server that stores and retrieves files, which we refer to as artifacts.
The vast majority of software depends on external libraries. In Java, these libraries are stored in binary files called JAR files. Most of the libraries used are open source, and when a build requires them, it will automatically query a local repository manager. If the local repository manager does not contain a particular artifact, it will retrieve it from an external repository server and cache it for future use.
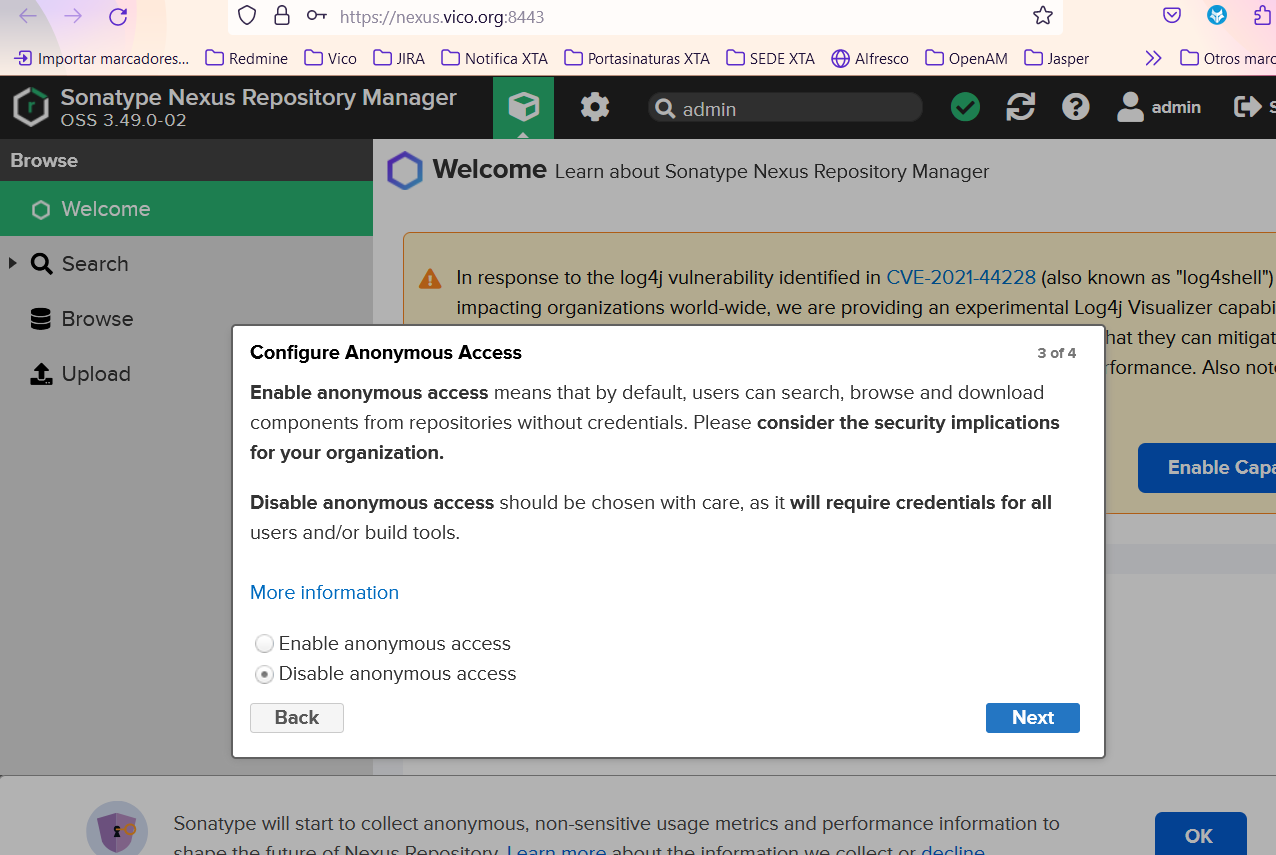
At VICO, a private Nexus repository (https://nexus.vico.org:8443) was created mainly to store the artifacts required for building all the developed components.
How can we verify that our nexus-vico repository is working?
It is important to know that for Maven and Nexus to communicate, the connection must be secure; therefore, the repository URL must use HTTPS.
At the moment, the only artifact added to the Nexus repository is asm-all version 3.3. This artifact no longer exists in public repositories (Maven Central, Nexus, or even the public OpenESB repository).
This artifact was, and still is, downloaded if you have access to the Amtega Nexus repositories:
http://nexus.xunta.local/nexus/content/groups/public/
Important: in the settings.xml file, the repository must be defined:
<![CDATA[<repository>
                    <id>nexus-vico-repository</id>
                    <name>NEXUS-VICO</name>
                    <url><https://nexus.vico.org:8443/repository/maven-releases/</url>>
                    <releases>
                        <enabled>true</enabled>
                    </releases>
                    <snapshots>
                        <enabled>false</enabled>
                    </snapshots>
   </repository>]]>
And also define the username and password so it can access the repository:
<![CDATA[<server>
		<id>nexus-vico-repository</id>
		<username>user_nexus</username>
		<password>pass_nexus</password>
</server>]]>
Or in the following way, if the variables are added in the pipeline:
<![CDATA[	<server>
		<id>nexus-vico-repository</id>
		<username>${user_server_nexus}</username>
		<password>${password_server_nexus}</password>
	</server>

    <server>
        <id>nexus-vico-releases</id>
        <username>${user_nexus_admin}</username>
        <password>${password_nexus_admin}</password>
    </server>

    <server>
        <id>nexus-vico-snapshots</id>
        <username>${user_nexus_admin}</username>
        <password>${password_nexus_admin}</password>
    </server>
]]>
If this configuration has been set up correctly, we can test it by deleting the asm-all artifact from our local repository and then running mvn install. At that point, the artifact should be downloaded from our repository.
In the console log of an mvn install, we could see something like this:
<![CDATA[Transfer failed for https://nexus.vico.org:8443/repository/maven-releases/org/glassfish/external/asm-all/3.3/asm-all-3.3.pom:
PKIX path validation failed: java.security.cert.CertPathValidatorException: validity check failed: NotAfter: Thu Jun 15 10:25:34 UTC 2023]]>
The settings.xml configuration file is presented as follows. It is located at the root of the OpenESB project:
<![CDATA[<settings xmlns="http://maven.apache.org/SETTINGS/1.0.0"
    xmlns:xsi="http://www.w3.org/2001/XMLSchema-instance"
    xsi:schemaLocation="http://maven.apache.org/SETTINGS/1.0.0 https://maven.apache.org/xsd/settings-1.0.0.xsd">

  <servers>
    <!-- server
     | Specifies the authentication information to use when connecting to a particular server, identified by
     | a unique name within the system (referred to by the 'id' attribute below).
     |
     | NOTE: You should either specify username/password OR privateKey/passphrase, since these pairings are
     |       used together.
     |
    <server>
      <id>deploymentRepo</id>
      <username>repouser</username>
      <password>repopwd</password>
    </server>
    -->
	<!--
     - <servers> specify the repositories we deploy or release artifacts to.
     -
     - The <id> tag specified here should match up with an <id> tag for a <repository> or <snapshotRepository>
     - located in the <distributionManagement> section of your project's pom.xml
     -->
	<server>
		<id>nexus-vico-repository</id>
		<username>${user_server_nexus}</username>
		<password>${password_server_nexus}</password>
	</server>

    <server>
        <id>nexus-vico-releases</id>
        <username>${user_nexus_admin}</username>
        <password>${password_nexus_admin}</password>
    </server>

    <server>
        <id>nexus-vico-snapshots</id>
        <username>${user_nexus_admin}</username>
        <password>${password_nexus_admin}</password>
    </server>

  </servers>

    <profiles>
        <profile>
            <id>openesb-repo</id>
            <repositories>

                <repository>
                    <id>maven-repo</id>
                    <url>https://repo.maven.apache.org/maven2/</url>
                    <releases>
                        <enabled>true</enabled>
                    </releases>
                    <snapshots>
                        <enabled>false</enabled>
                    </snapshots>
                </repository>

                <repository>
                    <id>maven2-repo1</id>
                    <url>  https://repo1.maven.org/maven2/</url>
                    <releases>
                        <enabled>true</enabled>
                    </releases>
                    <snapshots>
                        <enabled>false</enabled>
                    </snapshots>
                </repository>

                <repository>
                    <id>nexus-community-stam</id>
                    <name>Adobe Public Repository</name>
                    <url>https://nexus.open-esb.net/repository/maven-releases/</url>
                    <releases>
                        <enabled>true</enabled>
                    </releases>
                    <snapshots>
                        <enabled>false</enabled>
                    </snapshots>
                </repository>


				<repository>
                    <id>nexus-vico-releases</id>
                    <name>NEXUS-VICO-RELEASES</name>
                    <url>https://nexus.vico.org:8443/repository/maven-releases/</url>
                    <releases>
                        <enabled>true</enabled>
                    </releases>
                    <snapshots>
                        <enabled>false</enabled>
                    </snapshots>
                </repository>


            </repositories>

            <pluginRepositories>
                <pluginRepository>
                    <id>nexus-community-stam</id>
                    <url>https://nexus.open-esb.net/repository/maven-releases/</url>
                    <releases>
                        <enabled>true</enabled>
                    </releases>
                    <snapshots>
                        <enabled>false</enabled>
                    </snapshots>
                </pluginRepository>
            </pluginRepositories>

        </profile>
    </profiles>

</settings>
]]>
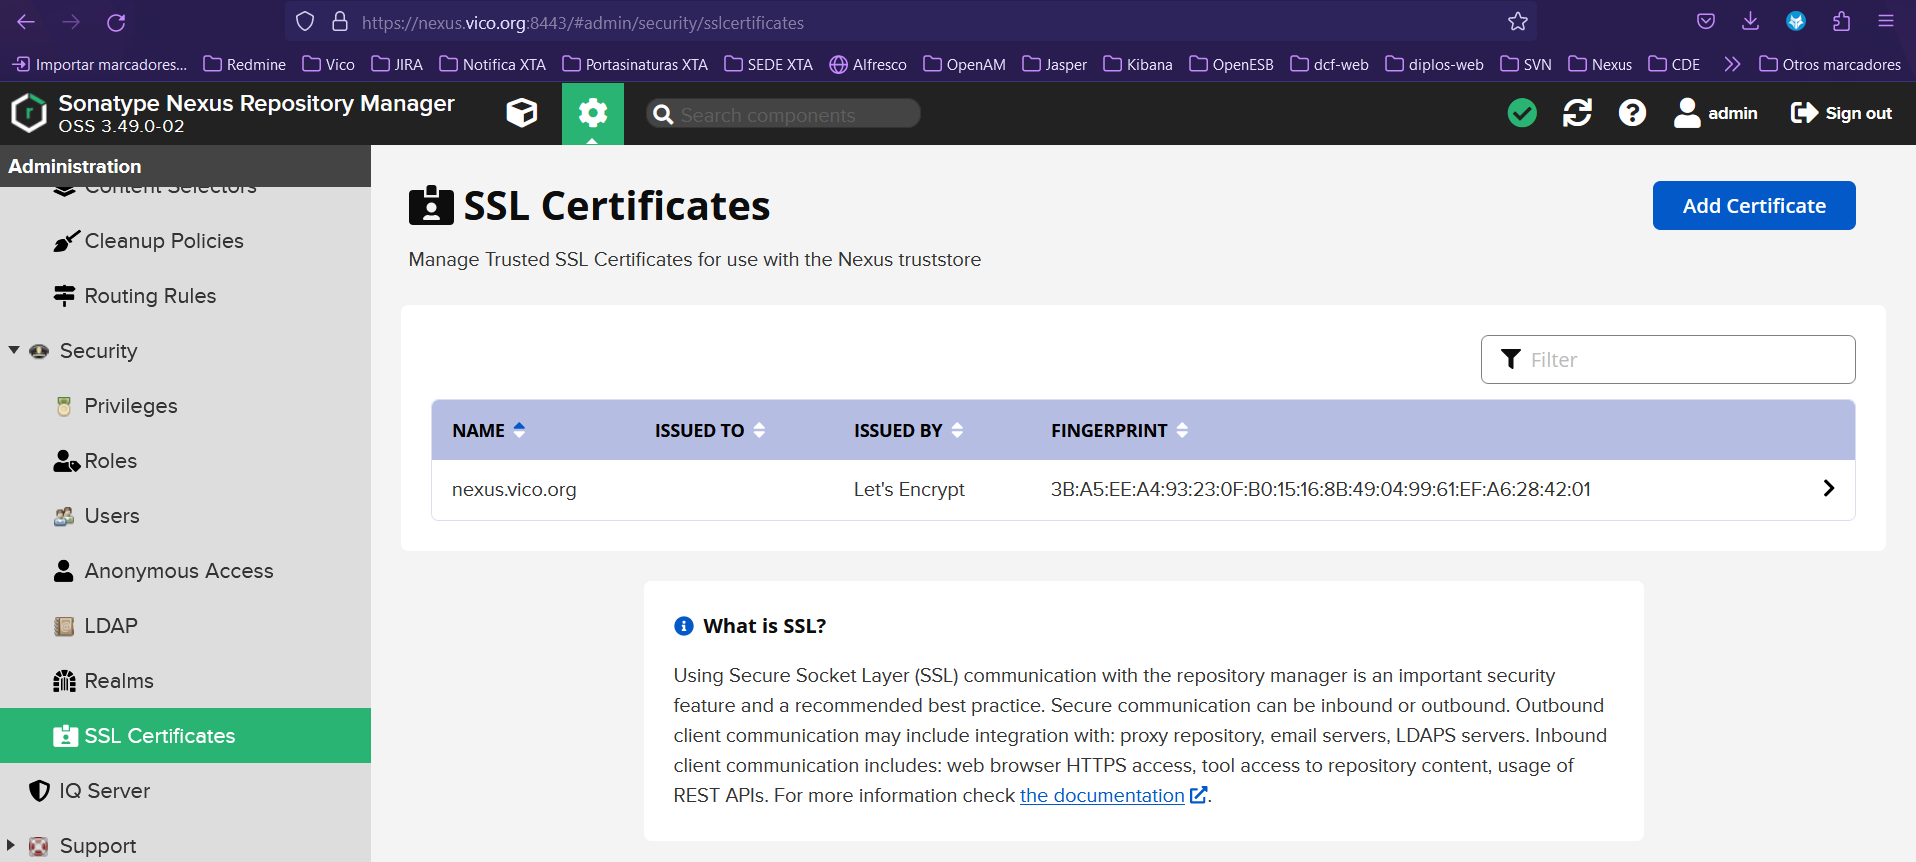
Certificates in Nexus for HTTPS Connections
https://www.adictosaltrabajo.com/2018/10/30/nexus-en-https-con-lets-encrypt/
Steps to follow to update de certificate
Run it from:
<![CDATA[/opt/sonatype-work/nexus3/etc/ssl
sudo openssl pkcs12 -export -inkey /etc/letsencrypt/live/nexus.vico.org/privkey.pem -in /etc/letsencrypt/live/nexus.vico.org/fullchain.pem -out jetty.pkcs12
]]>
If it asks for a password, enter "p".
<![CDATA[sudo keytool -importkeystore -noprompt -srckeystore jetty.pkcs12 -srcstoretype PKCS12 -srcstorepass p -destkeystore keystore.jks -deststorepass storep -deststoretype PKCS12 -destkeypass storep
]]>
Restart nexus
<![CDATA[sudo systemctl restart]]>
Other Commands to check the status, srtat, stop the nexus service
<![CDATA[sudo systemctl status nexus
sudo systemctl stop nexus
sudo systemctl start nexus
sudo systemctl enable nexus]]>
Install Nexus server:
https://www.fosstechnix.com/how-to-install-nexus-repository-on-ubuntu/
SonarQube

It is a platform used to evaluate source code quality. It is open source and uses various static code analysis tools such as Checkstyle, PMD, or FindBugs to obtain metrics that help improve the quality of a software project.
It integrates with Maven and Continuous Integration tools such as Jenkins.
Ideally, Jira tasks should be created referencing the detected bug and/or vulnerability in order to improve the source code quality of the project.
Main Quality Categories
Reliability
Focused on bugs, representing issues in the code that may cause incorrect behavior.
Security
Focused on vulnerabilities, representing potential backdoors or security risks for attackers.
Maintainability
Focused on code smells, representing issues related to code sustainability and maintainability.
Most Important Code Quality Metrics
-
Duplication Density
-
Lines of Code
-
Technical Debt and Debt Ratio
-
Code Coverage
-
Comment Density
SonarQube was installed on VICO's own infrastructure. It can be accessed externally through a secure port and an HTTPS connection:
https://sonarqube.vico.org:9943
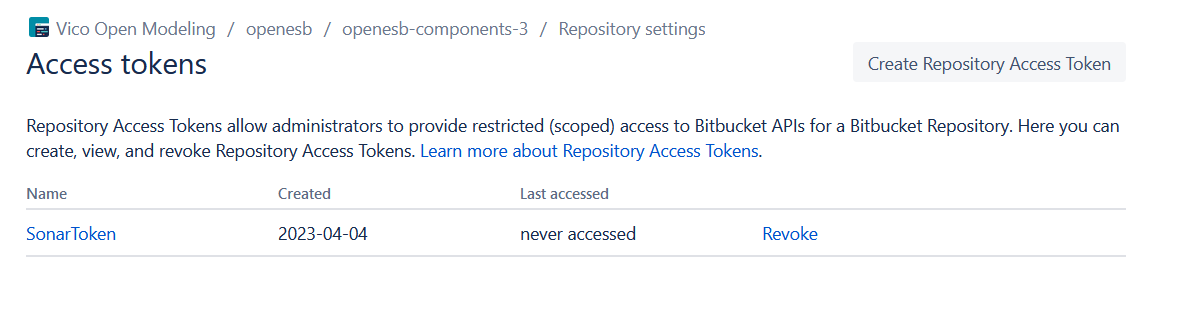
The code inspection through Sonar has been configured to run every time a commit is made to the repository branch defined in the bitbucket-pipelines.yml.
It is necessary, at the Bitbucket configuration level, to create an Access Token for Sonar:
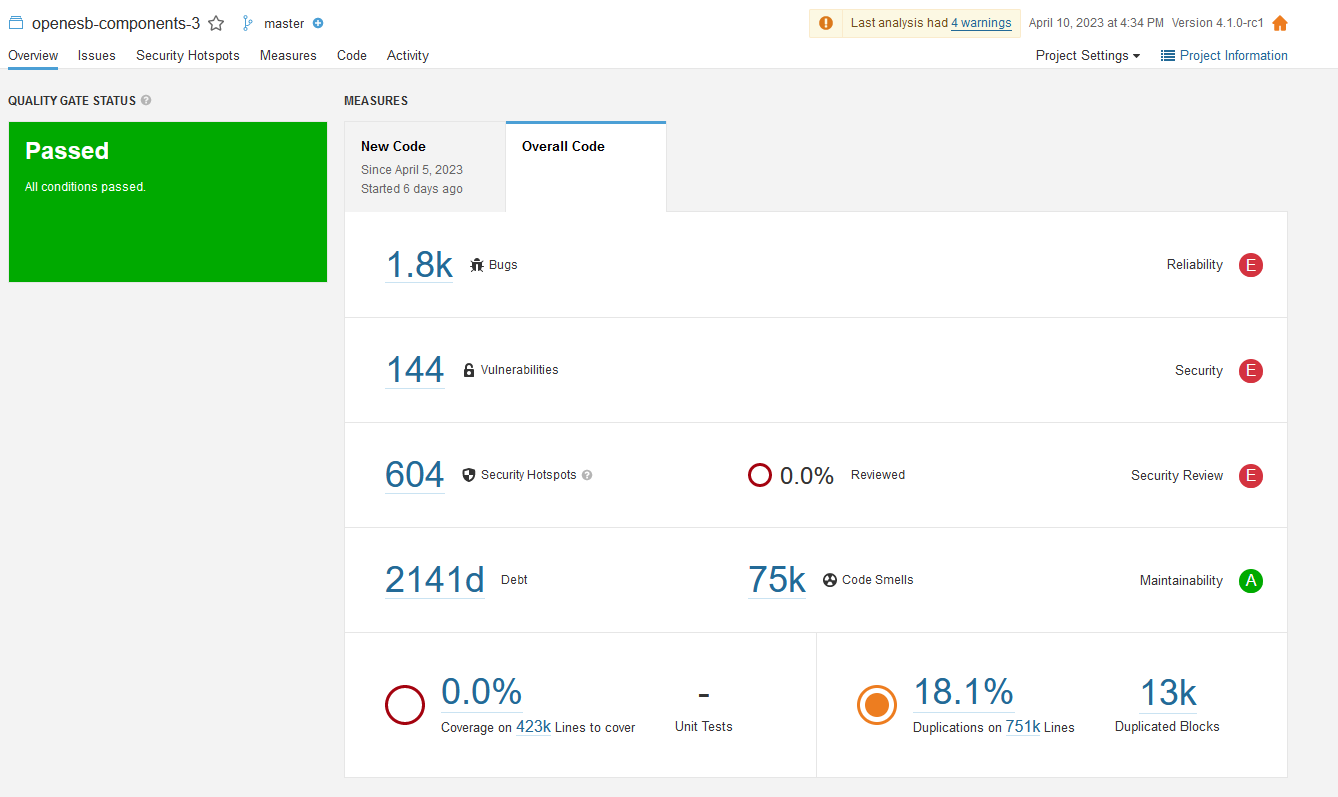
SonarQube Walkthrough – OpenESB Project Analysis
General Visualization of Code Inspection in the OpenESB Project:
- We can also filter the issues by components:
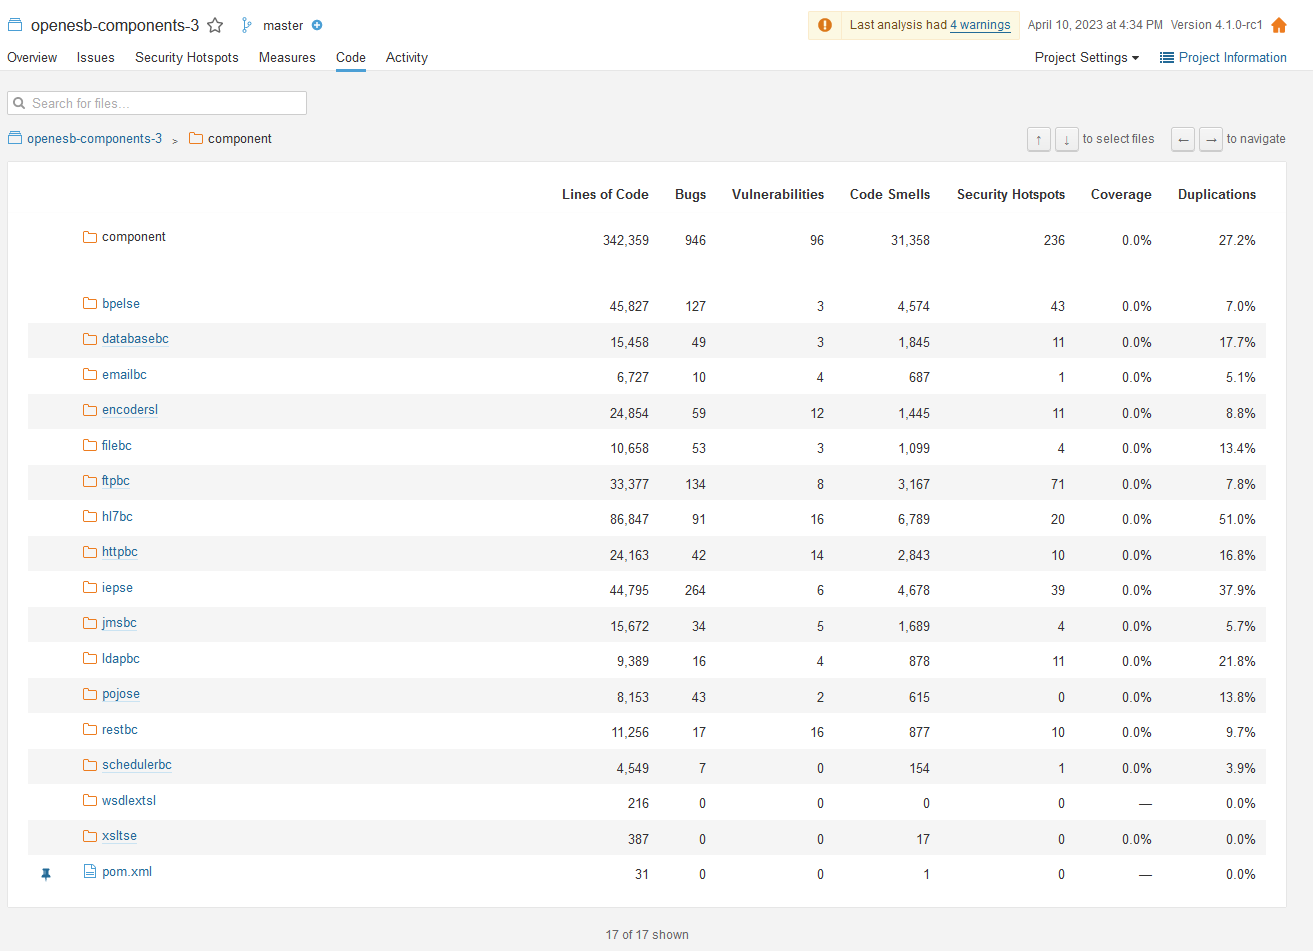
- The identified issues in the
httpbccomponent are displayed:

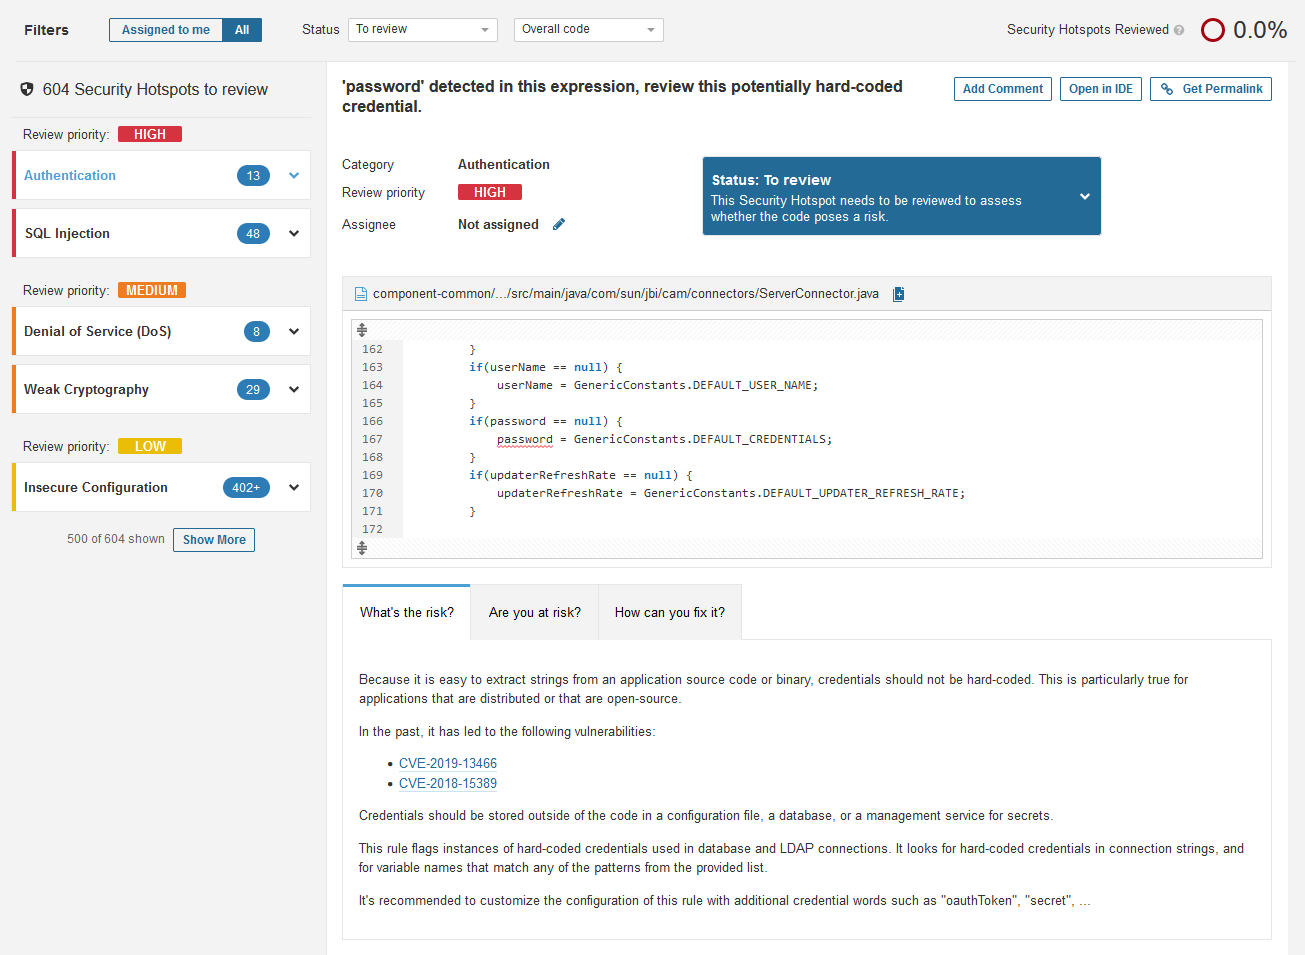
Some of the issues identified in the Security Hotspots section are shown below.
Among the high-priority issues, there are 13 authentication-related issues and 48 SQL Injection issues.